Hainanese Chicken Rice
Simple flavors combine to deliver a strikingly delicious meal
Servings 4 servings
Calories 1220kcal
Ingredients
For the chicken
For the chicken’s poaching-stock
- 2 ½ ounces ginger root cut into 1/8-inch slices, skin and all
- 4 scallions or spring onions. Roots trimmed off and halved lengthways. Use all the white parts and all the crisp green leaves.
- 1 chicken stock cube This I recommend so that you create an obvious chicken flavor in your poaching stock.
- Water enough to just cover the chicken in the pan you use to poach it
**For the poached chicken’s ice-bath
- 20 ice cubes together with enough cold water in a good size bowl to cover the just-poached chicken.
For the rice
- 2 ½ cups jasmine rice
- 4 cloves garlic peeled and very thinly sliced
- 1 ½ ounces ginger root grated, skin and all
- 3 scallions or spring onions. Roots trimmed off, sliced into 1/3-inch disks – use all the white parts and all the crisp green leaves.
- 3 tablespoons pure clarified chicken fat a.k.a. schmalz
- 1 tablespoon sesame oil
- 4 cups chicken’s poaching stock from above
For the ginger and garlic sauce
- 4 cloves garlic peeled and very finely chopped
- 2 heaped tablespoons ginger root finely grated, skin and all
- 3 scallions or spring onions, finely chopped. Use all the white parts and all the crisp green leaves.
- 4 tablespoons sesame oil
- 1 teaspoon ground sea salt
For the chili sauce
- 8 Thai bird’s eye chilies fresh, red, and very finely chopped, skin and all. I used red bird’s eyes, but if you can find them, orange ones would be even better. Size? About 2 ½ inches long will be fine.
- 6 cloves garlic peeled and very finely chopped
- 1 ½ ounces ginger root finely grated, skin and all
- 1 heaped teaspoon white sugar
- 1 tablespoon sesame oil
- 2 limes the juice and flesh from both limes
- 2 tablespoons chicken’s poaching stock from above
For the soy sauce
- 1/3 cup dark soy sauce
- 2 tablespoons palm sugar I use those hard, sort of half-spheres of palm sugar, and each of those equals approximately a level tablespoon of ground palm sugar.
- ¼ cup water
For the cucumber
- 1 English cucumber medium-sized, peeled in lengthwise stripes, and cut on the diagonal into 1/3-inch slices.
Instructions
Poaching the chicken and cooling the chicken
- For this, you’ll need a medium-to-large saucepan that’s big enough to hold the chicken with an inch or so’s space all around it. The pan needs to be big enough so you can just cover the chicken with water, and it needs to have a snugly fitting lid.
- Thoroughly rub the chicken all over with 2 heaped teaspoons finely ground sea salt. This will help to create a glossy sheen on the skin as it poaches and ‘bind’ it with the layer of fat beneath it. Set the chicken aside for a few minutes while you prep the poaching-stock and bring it to the boil in your selected saucepan.
- Fill the pan two-thirds full of water, and add the scallions (or spring onions), ginger, stock cube, and salt. As soon as the pan comes to a good rolling boil, drop the heat to low and let the water settle into to an evenly bubbling simmer.
- Lower the chicken – breast-side up - into the simmering pan. Now adjust the level of the water so that it’s just covering the chicken. I added a little more boiling water to do that. Time now for an important taste test.
- Taste a little of the stock – what you’re looking for is a level of savory saltiness that’s just verging on being a touch too salty for your taste. So, you might want to add a little more salt to reach that level. This matters because your rice is going to be cooked in this stock, and that’s where a good deal of the rice’s chicken flavor comes from.
- Now, for the next 50 minutes, you want the chicken to poach in your covered pan at a constant, gently bubbling simmer. You’ll probably find you need to adjust the heat a few times to maintain that constant, gentle simmer. You’ll also need to give the stock a few gentle stirs to encourage a bit of simmering water flow in and out of the chicken’s cavity.
- Just before the 50 minutes is up, add the ice cubes to a bowl or pan that’s easily big enough to hold the chicken. Once the 50 minutes’ of poaching is done, turn off the heat, carefully remove the chicken and set it in its ice bath for 15 minutes.
- The poaching stock with its ginger and onions can just sit where it is. Do not discard any of it. Some of the stock is going to be used to cook the rice, and you’re going to add a little of it to your chili sauce.
- Once the chicken had its 15 minutes in the ice bath, carefully remove the chicken, and let it thoroughly drain on a few sheets of kitchen towel. That’s it, your chicken is now ready to be carved and served.
- Do take some special care when you lift the chicken from its stock, set it in the ice bath and then remove it. The skin is fragile and tears easily – especially when it comes out of the hot poaching stock. The skin will firm up as it cools, but it’ll still need some careful handling.
- While the chicken’s poaching and then cooling, you’ll have ample time to make the trio of sauces, cook the rice, and slice the cucumbers.
Making the trio of sauces
- For the ginger and garlic sauce, begin by heating the sesame oil in a small saucepan over high heat.
- As soon as the oil starts shimmering - but not quite smoking - quickly stir in the ginger, garlic, and scallions (or spring onions). Keep stirring the mix as it sizzles away for 90 seconds on that high heat, and then turn off the heat.
- During that 90 seconds’ hot sizzle-and-stir, you want the mix to just start picking up a little golden color, and for its flavors to infuse the oil.
- Stir the pan a few times as the sauce cools - the garlic, ginger, and onion will darken a little more in the still-hot oil and continue to release their flavors into the oil. So, keep stirring until the sizzle stops. Done. Let the sauce cool, and it’s ready to serve.
- For the chili sauce, you want to chop the chilis and garlic very finely. Once you’ve done that, sprinkle the salt and white sugar over them, and use the side of a heavy blade to crush them into quite a fine paste.
- Add the paste to a mixing bowl and thoroughly stir in the sesame oil and lime juice. Almost done. All that’s left to do is to add 2 tablespoons of the chicken’s hot poaching stock once the chicken’s cooked. Stir that in really well, and your chili sauce is ready to serve. So, as soon as the chicken comes out of its poaching stock, do remember to add that hot stock to your chili sauce.
- For the soy sauce, simply add all the ingredients to a small saucepan set on medium heat. Let the pan come up to a slow simmer, and then drop the heat to low. Keep stirring over that low heat until the palm sugar completely dissolves. Done. Turn off the heat and let the sauce cool, ready for serving.
Cooking the rice
- Fry first, then boil, and a word about timing. You want to start cooking the rice as soon as the poached chicken goes into its ice bath. That way, the rice will be ready to serve as soon as the chicken is ready to be carved.
- So, for the frying, add the schmalz and sesame oil to a big, heavy-based skillet (I used a 12-inch one) and set it on medium-high heat. Let it heat for about a minute, then stir in the garlic, ginger, and scallions (or spring onions) so they all get a good coating of the fatty oil.
- You want to stir fry the mix over that medium-high heat until the edges of the onion greens start to darken and crisp a little. That’ll take about 2 minutes or so. As soon as that happens, stir in all the rice. Take some care here to make sure that the rice is thoroughly mixed with the garlic, ginger, and onions, and that all the grains pick up a glossy shine from the fatty oil.
- Keep stir-frying the rice mix on that medium-high heat for another 3 minutes. You want to be stirring all the while – slow-and-steady - until the rice picks up a pale golden color. You’ll find that some grains get much darker and turn crisp – that’s just dandy. The same goes for some of the onion and garlic.
- Turn off the heat and let the skillet sit while you get ready for boiling the rice.
- To do that, add 4 cups of the chicken’s poaching stock to a medium size pan and bring it to a boil over high heat.
- As soon as it comes to a boil, stir in everything from your rice-frying skillet. I used a little of the boiling stock to make sure everything from the skillet went into the boiling poaching stock. Cover the pan and turn the heat to low – very low.
- On that very low heat, you want to give the rice enough time to absorb all the liquid in the covered pan. That’ll probably take about 10 minutes or so. But do check the rice near the end of that time. It’s ok then to give the rice a slight stir if you feel it might be about to start sticking to the bottom of the pan.
- But ideally, you want to leave it alone until the rice absorbs all the liquid. As soon as that happens, the rice is done and ready for serving.
Carving the bird and serving your Hainanese chicken rice
- Set the cooled, drained chicken on a carving board. Using a heavy, sharp carving knife, remove the legs and wings as cleanly as you can from the body of the chicken, and set them on a plate ready to be served on your big wooden board.
- Now cut the body of the chicken in half - lengthways and straight through the center of the breast. A bit of determined confidence helps here, together with some firm downward pressure on that sharp knife.
- Turn each half of the body, so the breast-meat side is upwards, and carve neat, ½-inch thick slices of meat right through each breast.
- And, with all this carving, do take care not to tear the skin. However, if you do tear some – just like I did - not to worry. Just patch it back together as best you can.
- Gently remove any bones from the breast slices, and let the slices sit on your carving board while you start arranging things on the big board.
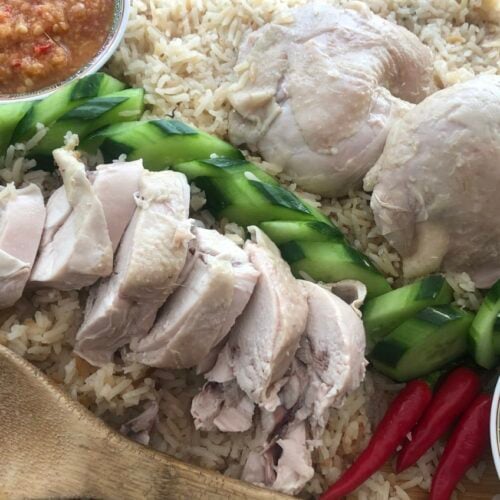
- Spoon the rice in an even pile diagonally across the board. Now arrange the slices of breast along one side of the rice, and the legs and wings on the opposite side. Leave a dividing gap between the two ‘lines’ of chicken, and then arrange the cucumber all down the central gap. Done.
- Set the board on your dining table with a couple of serving spoons, and the trio of sauces presented alongside in pretty little bowls. All that’s now left to do is to encourage folks to help themselves.
Notes
A little bit of simple organization makes a big difference with this dish. And with that in mind, there are a few ingredients that feature in different elements of this dish, so I’ll just mention those muti-use ingredients now, and the total quantities you’ll need. (Knowing this up-front might prevent multiple visits to the store.)
8 ounces fresh root ginger
10 - 12 medium size scallions / spring onions – choose the freshest you can find, with lovely, crisp green leaves
14 cloves garlic
6 tablespoons sesame oil
And, although it’s only used for frying the rice, you will need a few tablespoons of schmalz – that’s pure, clarified, flavorful chicken fat.
You’ll also need 20 or so ice cubes, a good size wooden board for serving the whole dish, and a heavy, sharp - and I mean sharp - carving knife for the chicken.
Nutrition
Calories: 1220kcal | Carbohydrates: 119g | Protein: 49g | Fat: 61g | Saturated Fat: 14g | Polyunsaturated Fat: 17g | Monounsaturated Fat: 25g | Trans Fat: 0.2g | Cholesterol: 151mg | Sodium: 2167mg | Potassium: 991mg | Fiber: 5g | Sugar: 8g | Vitamin A: 733IU | Vitamin C: 40mg | Calcium: 133mg | Iron: 4mg